Basic Bread Dough (with bread making tips, including hand-kneading instructions). If you’d like to learn how to bake bread, here’s a wonderful place to start. This easy white bread recipe bakes up deliciously golden brown. There’s nothing like the homemade When it’s properly kneaded, the dough should be stretchy and smooth.
 Kneading is a basic and repetitive technique, but there are still a few things to keep in mind to make. You can knead most bread doughs by hand or in a stand mixer (we’ll show each technique in detail below). Kneading dough by hand can be messy, and many home cooks add a lot of extra flour, which However, if you do not own a stand mixer, you can still make a good loaf of bread from most. You can have Basic Bread Dough (with bread making tips, including hand-kneading instructions) using 7 ingredients and 19 steps. Here is how you achieve that.
Ingredients of Basic Bread Dough (with bread making tips, including hand-kneading instructions)
- It’s 300 grams of Bread (strong) flour.
- It’s 6 grams of Dried yeast.
- You need 30 grams of Sugar.
- You need 4 1/2 grams of Salt.
- You need 6 grams of Skim milk powder.
- Prepare 200 grams of total Egg (1) + water.
- It’s 30 grams of Shortening.
How to Knead Dough for Pizza, Bread, Pita etc. But just because an ingredient list is basic, doesn’t mean it’s Kneading is all about teaching your hands what to expect from the dough. There’s going to come a A solid foundation is the first part of building a house, whether that house is made from wood or challah. Traditionally bread dough is kneaded by hand or using a mixer until the dough softens and becomes elastic.
Basic Bread Dough (with bread making tips, including hand-kneading instructions) instructions
- Knead the dough: Put all the ingredients in a bread machine, and run the “dough” program until the 1st rising is about to start. Tip: The water temperature should be 45°C - the ambient temperature (see Hints)..
- 1st rising: If you are using a dough proofing container, oil the inside of a bowl and put in the dough. Tip: Round off the dough into a smooth ball with a taut surface..
- Divide the dough: Divide the dough into 50 g pieces, and round off each piece. Tip: Keep the dough covered when you’re not working on it to prevent it from drying out!.
- Rest: Cover the dough with a tightly wrung out moistened kitchen towel or put it in a lidded container, and rest for 15 minutes. Tip: The dough will rise a little while resting, so leave space between the pieces..
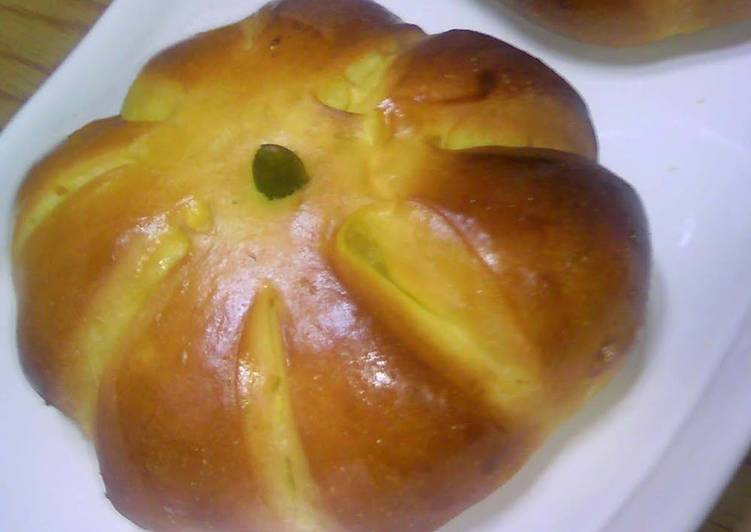
- Form the dough: Turn each piece of dough over and press down gently with your palms. Roll the dough out with a rolling pin and wrap it around or fill with anything you like..
- 2nd rising: Leave to rise in a proofing container for 25 minutes. Tip: If the dough hasn’t risen much after 25 minutes, leave for a while more until it has..
- Baking: Bake for 11 minutes at 180°C. Tip: Adjust the temperature depending on how brown the bread is getting. (Don’t change the baking time though if possible.).
- How to use a pastry cutter. To cut the dough with a pastry scraper or cutter, press straight down on it. Tip: Don’t use a back and forth sawing motion to cut the dough..
- What to do if you forget to add the yeast? Dissolve the yeast in a little lukewarm water, add it to the dough, and knead well..
- How to hand knead: Put the flours in a bowl, and mix with your hands. Tip: Keep the salt and yeast apart since salt inhibits the yeast..
- Put the egg + water into the bowl in about 3 batches, kneading well between additions. Tip: The egg + water temperature should be 45°C minus the ambient temperature (see Hints)..
- When the dough comes together in one mass, add the shortening and keep kneading. Tip: When everything is well combined and the dough no longer sticks to your hands, it’s good!.
- Take the dough out of the bowl, hold it securely in one hand, and smack it against your work surface. Tip: Don’t let go of the dough when you smack it down..
- Smack it down 3 times, then round off the dough. Repeat this procedure until you’ve smacked down the dough about 100 times. Round off the dough..
- Form the dough into a ball with a smooth, taut surface. Place the dough into an oiled bowl and cover the bowl with plastic wrap. Tip: Use a large bowl..
- Leave in a warm place to rise for 40 minutes. From this point on follow Step 3 and onwards..
- Easy hand kneading: Put the flours in a plastic bag and shake to combine. Tip: Hold the bag opening securely closed..
- Add the egg + water to the bag, and mix well. Add the shortening, and knead the dough well over the bag..
- When the dough comes together, leave it to rise in the bag in a warm location for 40 minutes. From this point on follow step 3 and onwards..
A simple EASY recipe for No-Knead Sourdough Bread that takes very little hands-on time, rising A simple EASY recipe for No-Knead Sourdough Bread made with your own homemade sourdough Why I love this Sourdough Bread Recipe: The dough is made the night before and proofs overnight. Properly mixed dough is the first critical step to achieving great bread. Understanding what happens during the mixing / kneading process helps to determine if you are on the right track. Push the dough down and out, stretching it flat in front of you with the heels of your hands. See our recipe for Bread Machine Sourdough Bread for the original, machine-baked version.